The idea of getting a pilot license may seem overwhelming to a non-aviation person. Even when a merely recreational level of flying is concerned, getting yourself behind the yoke requires above-average commitment.
According to the statistics of the Federal Aviation Administration (FAA) in the USA, the drop-out rate of student pilots is around 80%. Reasons vary, but one of the most important ones is, indeed, the lack of commitment. While almost everyone can learn to fly, the amount of work to reach the goal turns too much for people who are not sufficiently motivated. And “sufficiently” here stands for “hecking a lot”.
Apart from being so demanding on itself, flying remains a highly regulated field. You will meet a lot of bureaucracy and even politics along the way.
This article is an ultimate step-by-step guide to learning to fly and getting a private pilot license (PPL) for airplanes in the Netherlands: things to-do, cost, useful tips. Hopefully, it will help to manage expectations and lower the entry burden for wannabe pilots. As the Netherlands is a member of the EU and EASA, many aspects of this article will be highly relevant to the other European countries too.
This guide is primarily targeted at beginners. If you have already researched the matter on your own, you may find it too elaborate. Please feel free to skip irrelevant things as you see fit.
So, how to learn to fly in the Netherlands?
What are the privileges of a PPL?
First of all, let’s get the terms in order. It’s not just a “PPL”, it’s a:
PPL(A) SEP VFR land with VFR R/T and LPE endorsements
It stands for:
Private pilot license, single engine piston land airplane, visual flight rules only, with visual flight rules radio-telephony and language proficiency (English) endorsements.
It means that as a license holder, you will be legally allowed to:
Act as a pilot-in-command (PIC) for a single-engine piston land airplane (but not helicopter, balloon or seaplane) with maximum take-off weight (MTOW) of 5.7 ton for non-commercial purposes in visual meteorological conditions (during day-time in reasonable visibility) with permission to perform radio-communication in controlled air-spaces using English language and carry unlimited number of passengers, provided that at least 3 take-offs, approaches and landings were performed during preceding 90 days on the same class of airplane.
The license itself doesn’t expire, but a SEP, which is a rating, needs to be revalidated every 2 years.
What are the restrictions of a PPL?
You might have already noticed that PPL isn’t really a golden ticket to flying and, in fact, there are more restrictions than privileges!
PPL is an ICAO license, which is recognized in any ICAO-state (almost worldwide).
Unfortunately, recognition is not always inferred automatically. As any Dutch pilot license is essentially a European license, it won’t be any problem to use it in other country of EASA / EU. However, don’t expect to take off in the USA or Canada, just with your European license in the pocket!
In practice, it will be often necessary to validate / convert your license into a locally issued variant of PPL. The process is pertinent to your specific situation, international, local laws and agreements between states. It’s a case-by-case venture, so don’t rely merely on things learned from your “Air Law” theory!
Furthermore, aviation flight crew licensing is a demanding matter. Every single pilot competency is properly trained, certified and monitored for currency at all times. There is a myriad of privileges which, despite looking logical, won’t be granted to you automatically with PPL unless you do dedicated extra training. For instance:
- Fly for hire and get paid.
Sharing rent and fuel costs with your passengers is totally fine with PPL as long as the contribution is optional for a passenger, and as long as a pilot contributes his own share. But that’s it. You can’t fly for hire or get paid in any circumstances.
To do so, you will need a more “advanced” license, like a commercial pilot license — CPL, airline transport pilot license — ATPL, or multi-crew pilot license — MPL. You may as well become a flight instructor — FI. Then you will be remunerated for instruction only.
It shall be noted that in some states certain specific commercial activities are permitted for PPL-holders, but those are really special cases. - Fly a multi-engine airplane.
Controlling a multi-engine airplane has its implications which need to be learned. You need a separate multi-engine (ME) rating for this. - Fly visually at night.
Flying at night is as spectacular as hazardous. In EASA countries, you need a separate night rating (NR) for this. Unlike the USA, it’s not included into your PPL by default. The good news for airplane pilots, though: NR is possibly the cheapest and easiest of ratings to obtain (only 5 flight hours + some theory). And it doesn’t expire.
Although some EU countries prohibit visual night flying, it is permitted in the Netherlands starting from 2020. It makes NR the most natural and affordable addition to your PPL license.
- Fly in low / no visibility, in clouds, in bad weather (by instruments).
Flying by instruments essentially means following the instrument flight rules — IFR. All commercial flights nowadays are conducted under IFR, thus allowing them to be performed in clouds, fog, rain, snow, and even land in near-zero visibility. To be able to do this, you need a separate instrument rating — IR.
In Europe, however, full IR is expensive and challenging to maintain for recreational pilots. The effort and costs associated with it may exceed those for PPL. Remarkably, it sometimes turns cheaper and faster to get full IR in the USA under the FAA rules and convert it back in Europe afterward, rather than training for it from scratch under the EASA rules. That’s why under EASA there are alternatives to full IR, like: EIR (en-route IR), CB-IR (competency-based IR) and BIR (basic IR, specially for general aviation pilots). - Fly in mountainous areas.
The weather in the mountains is unpredictable. States like Switzerland or France declare zones where you need a special training before being allowed into mountainous areas. - Tow a glider or a banner.
You need a separate rating for this as well. - Do aerobatics.
One does not simply perform aerobatics. Special training is required to obtain aerobatics rating. - And more…
You will only be able to start working on the most of these ratings / licenses after you’ve got a PPL and have built some flying hours. This makes PPL an essential building brick on your way towards aviation.
Excited? Let’s get started!
How to get a PPL?
Getting a private pilot license is a multiple step process. There is no specific order of doing things, as long as you complete all the steps.
— Obtain a medical certificate
- Duration: from an hour to a few months depending on your condition.
- Must be completed before: your first solo flight.
- How much: approx.€200+ excl. additional examinations
- Where in 🇳🇱: Aeglia (recommended), AirLein Medical, MCW, Fit to Fly, Medical4Pilots, KLM Health Services, Sky Medical Center, AEC Medicals, Aviation Medical Center.
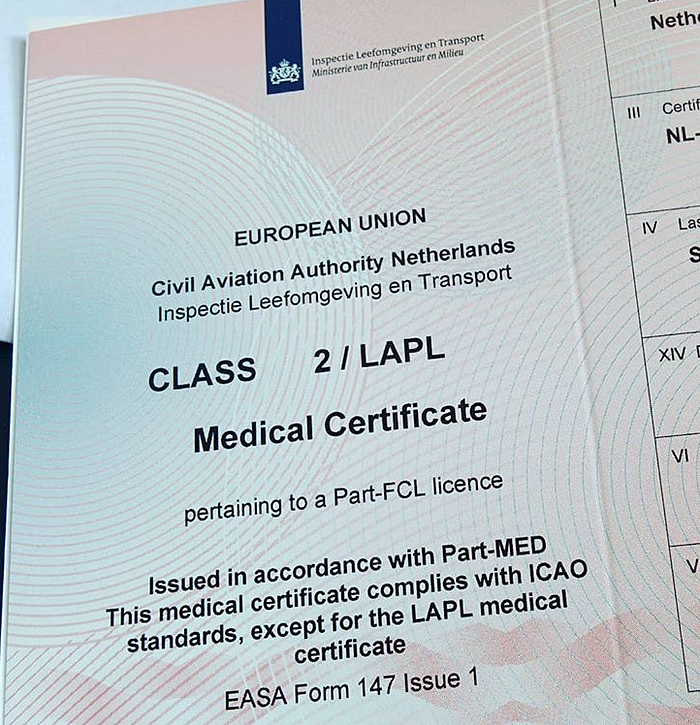
To get a PPL, you need at least a Class 2 medical certificate. To obtain one, you need to undergo a special aero-medical examination with an aero-medical examiner (AME). You need to be fit for flying at all times.
If you’re looking to get a greater or lower “level” of a pilot license, you may need to undergo medical examination of a different class. Here is a table explaining correlation between licenses and medical certificates required:

A Class 2 medical certificate needs to be revalidated every 5 years if you’re under 40 years old, 2 years if you’re under 50 y.o., and 1 year otherwise.
Having medical issues?
Contrary to the popular belief, you don’t have to be perfectly healthy to fly. But doing your aero medical examination will require much more additional work from you, your AME and the authorities, should you have any substandard health condition. You might find it useful to review my tips on doing a medical with a substandard condition.
— Pass your theory
- Duration: depends on your availability and learning abilities (from week after full-time intensive courses till several months for partial availability).
- Must be completed before: your practical skill-test.
- How much:
- €700–900 for the theory course, excl, books and other stuff;
- written exams:
- Option 1. The Netherlands (CBR)
€707 for all exams = €101 per exam × 7
(only in Dutch) - Option 2. Belgium (FOD Mobiliteit en Vervoer)
€100 for all subjects
(the best deal) - Option 3. The Netherlands (Exam center of Austro Control in Orbit Groundschool)
€495 for all subjects = €55 per subject × 9
(available since 2020)
- Option 1. The Netherlands (CBR)
- Where in 🇳🇱: several flight schools provide theory as well as practical training (see the list of flight schools below in this article), but if you want to learn theory in English, you are pretty much limited to Orbit Groundschool, Blu Bird and Vliegschool Hilversum, which are all the same e-learning platform white-labeled from EuroPilot (Belgium).
Theory for PPL includes 9 EASA theoretical subjects:
- Aircraft General Knowledge.
- Principles of Flight.
- Meteorology.
- Navigation.
- Flight Performance and Planning.
- Air Law and ATC Procedures.
- Operational Procedures.
- Human Performance and Limitations.
- Communication.
Your theory progress must be supervised by a certified training organization, which refers you to an official exam once you’re ready. You can’t enroll exams yourself.
There are certain training organizations which provide you with distant e-learning courses (which is convenient if you are working full-time). Yet, EASA requires you to attend a certain number of in-class lessons anyway. In my case, it was five consecutive evenings before I was permitted to exam.
To my naivety, I found out that there is no option to do a Dutch state PPL written in English. It has to be done in any other EASA state if you aren’t a fluent Dutch speaker. In my case, it was Belgium (option 2).
Update 2020: Since 2020 Orbit Groundschool (located in Arnhem) has become an exam center of Austro Control (Austria). This means that now you can take Austrian PPL theory exam in English while in the Netherlands (option 3).
In Belgium, subject test may be sat either individually or altogether in Federal Public Service Mobility and Transport in Dutch, English or French. Each test includes either 12 or 16 single-answer multiple choice questions. You have from 30 to 60 minutes to complete each test. If you attempt sitting all subjects in one day, you can reasonably account to complete those within roughly 4–7 hours. Minimum score to pass is 75% per subject.
If you think that it’s too much, talk to European ATPL (air transport pilot license) students: they have to pass 14 subjects by answering over 600 questions with total siting time of over 18 hours 🙂
Tests in Belgium were smartly balanced: although each test contained roughly the same ratio of questions of different complexity, the ratio of basic questions appeared very small and the ratio of “tricky” questions was always just enough for you not to meet the 75% threshold if you fail to recognize the “trick” correctly. Many questions are intentionally formulated in misleading and even illogical manner, and options are often very similar to each other, so you have to precisely know the nuance to choose “the most correct” answer.
If you decide to pass your theory in Dutch (option 1): Official Dutch PPL theory exams are 9 subjects re-combined into 7 exams and may only be sat in CBR. Each exam includes from 12 to 22 multiple choice questions and lasts from 30 to 75 minutes. Minimum score remains at or slightly higher than 75%.
Although PPL syllabus is meant to be unified across the Europe, trying to learn the theory in a language different from the official language of the country of your residence, can quickly turn messy. The choice of study materials and courses will be somewhat limited, comparing to the official language of your country. You will be forced to refer to study materials from the other EU countries with better availability of materials in English. This may confuse you even more, because not everything is aligned well across the countries, and you may bump into contradictions and even mistakes in materials. Additionally, on the exams you are likely to encounter nation-specific questions, which are not covered in study materials of other states and may catch you by surprise (e.g. “Which is the most typical weather in late autumn in Belgium?”, if you choose to pass Belgian exams).
For preparation, I used online courses from Orbit Groundschool (Europilot) backed up by Pooley’s PPL Training book series, few Android apps (like The PPL-App and EASA PPL Exam Tutor), BAFA question bank and numerous internet resources. Using a single resource didn’t feel like enough, so I combined them. However, this demonstrated very well how different and contradictory materials can be when used together. That’s why be cautious when consolidating your knowledge!
There are several formal conditions for the theory worth mentioning:
- All subjects must be passed within 18 months after the first subject has been passed.
- After all subjects were passed, you have 24 months to complete your practical PPL training and pass your final skill-test, otherwise you’ll have to re-sit the theory exams again.
- If you fail at least one subject 4+ times, you will have to re-sit all the other subjects.
It’s very individual, but my advice would be not to rush too much with theory. It might be somewhat tempting to get rid of these 9 exams as early as possible, so that there is more time left for practical training. But it actually feels better to spread your preparation to written over a longer period of time, so that it integrates naturally with your practical training.
— Pass VFR Radiotelephony (VFR R/T) and LPE English
- Duration: VFR R/T requires around 16 hours of training + exam; LPE exam can be done during a single 2 hours session if no additional English language training is required.
- How much: approx. €700
- Should be completed before: your first solo or PIC flight in controlled airspace or abroad.
- Where in 🇳🇱: ATC-COMM (recommended), iFly4You, AviaNoord Flight Training Center, Air-Comms, Aero Center Teuge, Fraseo Link, Rotterdamsche Aero Club…
It is legally optional step. Without an R/T you will still get your license, but you won’t be permitted to communicate via radios or fly abroad. As this will deem your PPL virtually useless, there is probably no-one who wouldn’t accomplish this step.
If your flight training is performed on a controlled airfield, then it will be mandatory for you to have VFR R/T and LPE before your first solo flight.
VFR R/T (Visual Flight Rules Radiotelephony) involves practicing standard phraseology used in communications during day-to-day flying in visual meteorological conditions (VMC).
During the training sessions, your instructor is going to act as an air traffic controller and students are to play the role of pilots. Altogether they will use standard phraseology while exercising typical in-flight scenarios: delivery, start-up, taxiing, take-off, departure, crossing different types of air-spaces (uncontrolled, FIRs, CTRs), arrival, landing, shut-down, diversion, urgency, and emergency.
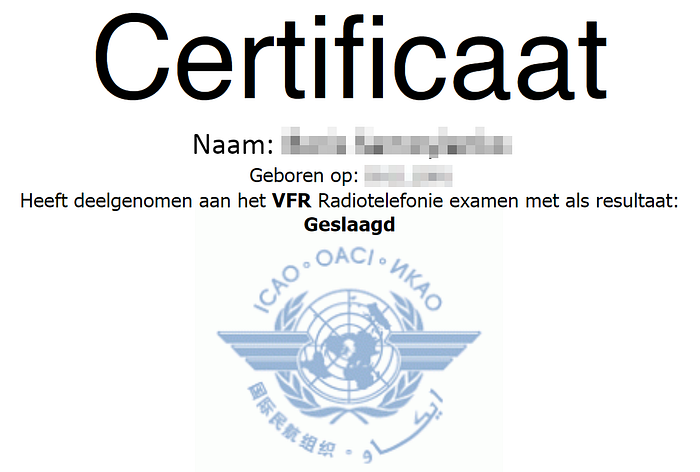
LPE English (Language Proficiency Endorsement) certifies that you have command of English language good enough to communicate via radio. The exam for LPE includes tasks to describe pictures on aviation-related topics, answer certain aviation-related questions and perform a radiotelephony conversation with a virtual air traffic control during a simulated flight. That’s why it’s recommended (but not required) to first complete VFR R/T, so you don’t waste time figuring out what to respond on the exam.
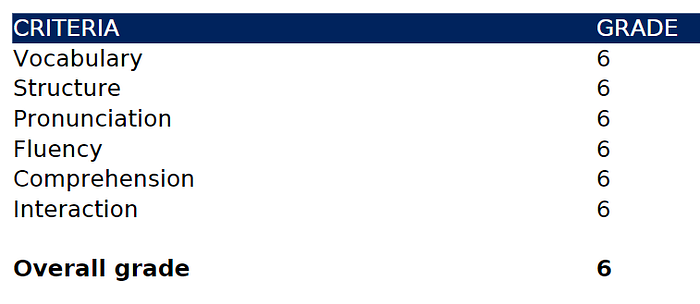
Each aspect of your speaking will be graded on a 6-point ICAO scale. Total result will be the lowest of these grades. You need to obtain at least level 4 to pass. If you obtain the maximum level of 6, you won’t have to renew LPE ever again in your life.
Both VFR R/T and LPE can be completed remotely nowadays. There are training organizations that provide training sessions and exams via voice communication software to simulate real radio communication between students.
Keep in mind that a R/T endorsement is not valid without a valid LPE endorsement!
— Attend practical training
- Duration: minimum 45 flight hours; from couple of months for full availability and up to 1.5+ years for partial availability
- How much: approx. €180–300 per flight hour (block or tachometer time + instruction rate) depending on school and landing fees
- Where in 🇳🇱 : Vliegschool Hilversum, Wings over Holland, KLM Aeroclub, NimbusAir, Blu Bird, Rotor and Wings, Vliegclub Flevo, Vliegclub Rotterdam, Rotterdamsche Aero Club, Dutch Aviation Partner, Martinair Flight Academy, Aero Club Hilversum Amsterdam, Aeroclub Maritime, Breda Aviation, Eindhovense Aeroclub motorvliegen, iFly4You, Vliegclub Fryslân, Adventure Flights, Vliegclub Seppe, Special Air Services, Vliegclub Twente, Vliegclub Westerwolde, Aeroclub Zeeland, AirBet, Vliegschool Angel Air, FlightLevel, Noord Nederlandse Aero Club Eelde, ExecutiveFlight, AviaNoord Flight Training Center, Nederlandse Academie voor Verkeersvliegers, Aero Center Teuge, Sky Service Netherlands, airFurste, ACT Air Transport, LionAir Rotterdam, Kempen Airport, AeroLin Training, ZelfVliegen…
Choose a school
I intentionally emphasized finding a flight school as a dedicated action. You have to find a place which not only fits your practical needs, but also has the right attitudes to safety, knowledge sharing and fleet maintenance. Ensure that the school has capacity of instructors and airplanes available to accommodate your studies (you won’t benefit from endless waiting times and constantly changing instructors!). Challenge your school with questions on these matters before starting your training.
I realize it might be challenging for novice pilots to figure out how safe or generally good a school is. You simply don’t know what exactly you should be looking at! In fact, it took me about almost 200 flying hours and almost 10 flying schools / clubs, long after I completed PPL course, to start realizing, even remotely, what exactly was important and whatnot! That comes with experience, so don’t be afraid to make a mistake. Just make sure you make this judgement call to the best of your abilities!
Also, take into account the properties of the airfield where a school is located. For example:
- Grass airfields in the Netherlands may go closed for a day or two after heavy or lengthy rains due to soft ground. When they are not closed, there will be a plenty of days when certain maneuvers will be restricted (like, touch-and-go’s). That’s not beneficial for your training.
On the other hand, these airfields will greatly assist you in learning soft and short field techniques and navigating in non-paved environment. - Airfields with several runways will teach you to navigate in more complex environments, but you may have less cross-wind experience if these runways all have different directions.
- Controlled airfields may appear very complex and stressful at first due to lots of procedures and demanding communication, but it will help you to build solid communication skills right from the beginning of your training.
- Bigger airfields/airports normally have longer operating hours, so in summer you have more time to fly (for instance, you can fly after work on business days and not only on weekends), but they usually have higher landing fees and more priority traffic.
Last but not least: remember to choose the school you truly like. You’ll have to spend a lot of time with your instructor(s) and it’s important to do it in the right place with the right people. Trust me, you will need all the mental capacity you have for your flying lessons. You can’t afford to waste it on dealing with the discomfort with your instructor!
Prior to starting my training I walked into several flight schools in Lelystad and in Hilversum and there were none of them I didn’t like: I was welcomed almost everywhere, and was explained well on all questions I had.
My choice was pretty tough. Eventually I ended up in Vliegschool Hilversum and never regretted about it.
Your selection process is likely to may vary from mine. Remember to take your time, and don’t be tempted to choose just the cheapest or the closest school: otherwise you simply risk paying double!
About practical training
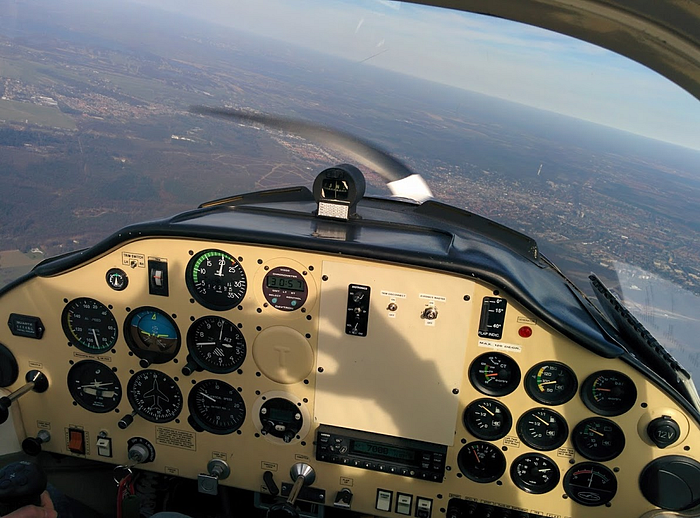
That’s the most exciting and the most important part of your PPL course.
Throughout this training you’ll need certain belongings like pilot log book, headset, light-reflecting jacket (depends on your aerodrome), VFR navigation map, knee-board and/or pilot bag at certain point, but don’t be in hurry with buying all these right away. Some schools can rent or even sell you some stuff, whilst some expect you to arrange everything yourself. Talk to your school about it.
From the legal prospective, you don’t need anything special to start your practical training. Even though some flight schools may request you to demonstrate your diplomas from school, college, or university proving that you studied Physics and Math, I failed to find any evidence suggesting that this is a legal prerequisite for a PPL course.
You can work on your theory, R/T and LPE in parallel with your practical training.
To complete your practical training, you need a minimum of 45 flight hours registered in your pilot log book, including:
- at least 25 flight hours with instructor (dual);
- at least 10 solo flight hours (alone, without instructor or passengers on-board) including at least 5 cross-country flight hours with at least 1 overland flight of at least 150 nautical miles (~270 km), during which full stop landing was performed at 2 aerodromes different from the aerodrome of departure.
An average person without former flying experience will definitely need more than bare 45 hours. The national average of the USA varies between 60 and 80 hours, but it’s not at all uncommon for these numbers to raise up to and well over 100 hours!
The legal minimum assumes your progress is ideal, and you learn everything from the first time and never regress. It’s rarely the case, so don’t be devastated if you fail to finish within 45 hours.
Standard practice syllabus includes:
- Taxiing
- Effect of controls
- Climb and descent
- Straight and level flight
- Take-off
- Approach
- Landing
- Turning and advanced turning
- Slow flight
- Stalling
- Spin avoidance (but not spin recovery!)
- Forced landings
- Precautionary landings
- (Basic) instrument flying
- Cross-country navigation
- Low level navigation
- Radio navigation
- Solo flying
- Extra training, if necessary
Your overall progress will depend on a great number of factors, like: your availability and commitment, your instructor, the airplane, the airfield, the regularity of lessons, your learning abilities and, of course, the weather. In the Netherlands, the weather is often not so favorable for flying, especially in winter. You may find yourself sitting on the ground for weeks.
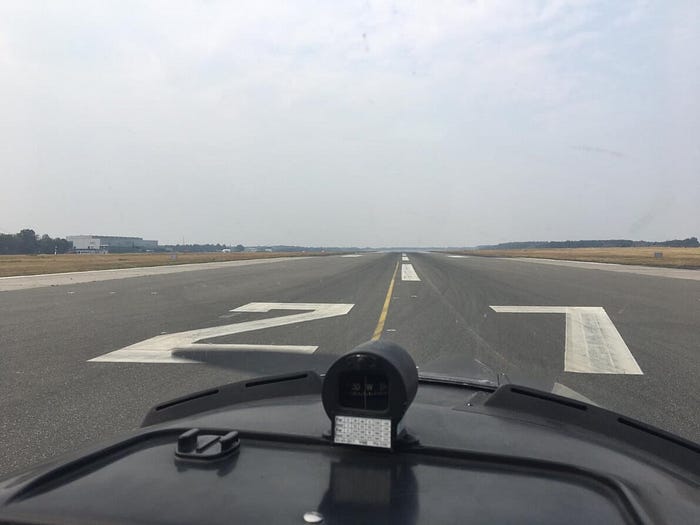
Your first solo flight will occur just before the middle of your training. Solo is a very special moment in life of every pilot, and quite many flight schools have certain traditions related to this. The very first solo flight has very strict weather minima. In countries like the Netherlands, you might find yourself waiting for your solo for a long time, again, due to the unfavorable weather.
I approached my solo in November and haven’t flown it until middle-March the next year! Typical Dutch winter weather implies that you fly max. an hour or two per month, if you’re constrained to weekends only. And even then, the weather conditions are probably suitable for a regular instruction lesson only.

Qualifying cross-country solo flight
Once the end of your flight training approaches, you will perform an overland solo flight of at least 150 nautical miles (~270 km), during which full stop landing are performed in at least 2 aerodromes different from the aerodrome of departure.
That will demonstrate your ability to perform a safe flight on your own and apply all knowledge and skills you’ve gained.
This flight is also difficult to arrange, since the stricter solo weather requirements must now be met not just at your base airfield, but along the whole route!
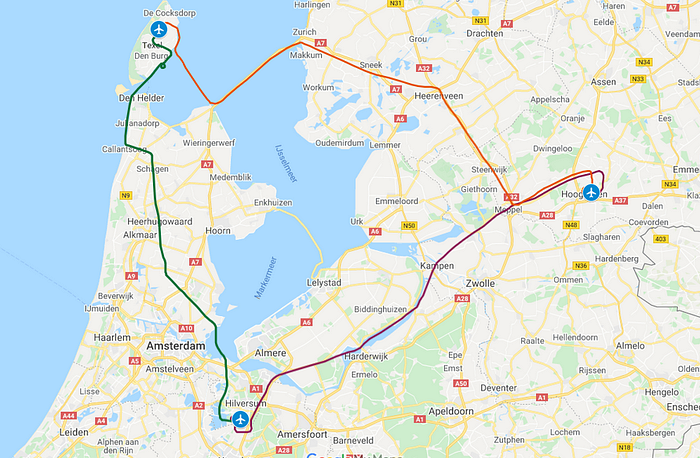
My flight routed as Hilversum (EHHV) — Texel (EHTX) — Hoogeveen (EHHO) — Hilversum (EHHV) was cancelled two times before flyable weather finally matched my agenda. That was August.
That was a too warm day, but I decided to fly regardless. As a result, my flight lasted half a day in outside air temperatures closing +30C and temperatures inside cockpit sometimes reaching +40C, but I never regretted 🙂
— Pass a skill-test
- Duration: approx. half a day
- How much: approx. €500–700 (around 1.5–2 hours of flight depending on school and landing fees + examiner fee)
Once everything is done and your flight school is confident that you are ready for a final skill test, they will arrange it for you with a certified examiner. You can’t arrange it yourself.
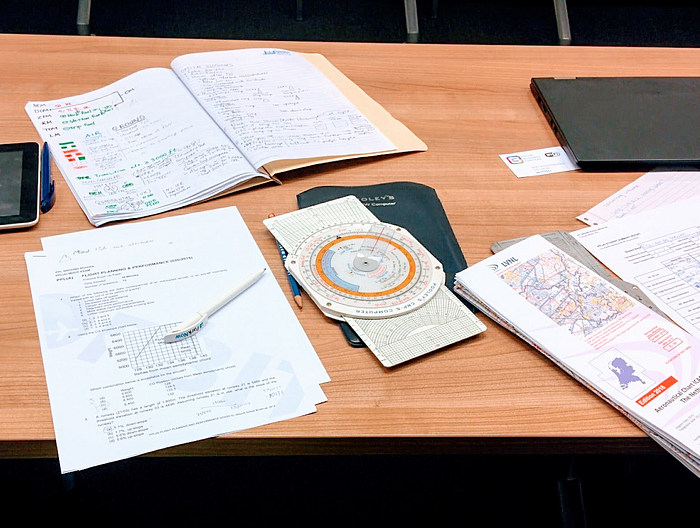
For a skill test you need to prepare an extensive flight briefing to demonstrate your flight planning skills e.g. flight planning, navigation planning, mass and balance, fuel calculations, performance calculations, gathering relevant weather information (METARs, TAFs, SIGMETs, charts, etc.), route information (navigation map with your route, NOTAMs, approach and ground charts of departure, arrival and alternate aerodromes, useful extracts from AIPs). You may reasonably expect that it will be quite a thick folder of papers at the end. No, you are not allowed to use those digital flight planning tools, like ForeFlight or SkyDemon, during your skill test!
On a theoretical part of your skill test, you will discuss these materials with your examiner. You will also be questioned on your practical airman knowledge. This won’t be that inclined to numbers and details as theoretical exams, but instead it will be more of a hands-on discussion, e.g. “What will you do in case of radio failure inside a CTR?”, “You feel smell of burnt wires while in-flight. Your actions?”, “What is the airspace structure at this point on the map? Where and under what conditions you are allowed to fly?”, “When is the higher chance of carburetor icing?”
Further, you will proceed with a practical part: the flight itself. All aspects of flying will be assessed there, including pre- and post-flight preparations, as well as the in-flight part itself. There is no specific order of how your flight should progress, as long as all points are covered. It’s probably going to look like the following.
You begin normally with following a navigation plan you prepared and maintaining a log on-the-fly. At a certain moment, you will be asked to divert to a certain point on the map and estimate arrival time.
After the diversion, you will be doing some familiar air-work: climbs, descends, steep turns, standard turns, slow flight, unusual attitude recovery (approach to stalls, stalls in different configurations) and, of course, simulated forced landings (landings in case of an engine failure).
Afterwards, you will proceed back to the airfield to do some landings like normal landing, flap-less, glide-in, etc. You may also be asked to demonstrate some soft or short field landing techniques, as well as crosswind techniques, if applicable.
Unlike CPL or ATPL, for PPL it’s not critical if you miss a few questions or if your maneuvers aren’t perfect. What’s more important is your over-all airmanship: your ability to be safe (e.g., don’t fly circuits in an opposite direction and don’t tailgate gliders), keep aircraft under control at all times (don’t accidentally stall it on approach or take-off), manage yourself and demonstrate reasonable decision-making. Safety and decisiveness is prioritized over precision.
— Apply for a license
- Duration: approx. 1–3 weeks
- How much: €639 (February, 2020)
- Where in 🇳🇱: Kiwa Register
Congratulations! Once your skill test is complete, all paperwork (signed skill test forms, theory results, medical, RT and LPE transcripts, pilot log book copies, etc.) are sent to the authority. In the Netherlands, this is Kiwa: a commercial organization, appointented by the Dutch aviation authorities to handle airman licensing.
This part can be done either by yourself or by your school, via post, e-mail or via online form.
Later, you will be requested by Kiwa to pay an invoice. Once complete, your long-awaited license will finally arrive at your postbox. Since that moment you will be permitted fly on your own as a proud PIC 🙂
As per beginning of 2020, official processing time at Kiwa is 7 days starting from the moment they received a payment from you (provided that application is complete and correct). In practice, it may take much longer. In my case, they missed an e-mail from my school and never started processing the application until I pinged them a few weeks later and helped them find the e-mail. Thankfully, after this my application was processed in expedited manner 🙂
Once a license is issued, the Netherlands is becoming your license issuing state. All the endorsements, ratings, etc. to your license must be processed there. If you move to another EASA state, you may have to request document (SOLI) transfer.
— Continue Flying!
- Duration: approx. whole life
You have a good reason to celebrate! But don’t get too relaxed: your learning is far from complete at this moment. A good pilot keeps learning forever ☺
Some people say: “PPL is a license to learn”.

Summary
How long does it all take?
The total duration of the course varies dramatically, depending on a myriad of factors.
Given the perfect conditions (you have full-time availability, a case with money, perfect weather all the time, instructors, and airplane always available for you, you’re a damn fast learner with photographic memory, you have excellent motor skills, and there’s a great vibe between you and your instructor), it is doable to obtain your license within roughly 3–6 months.
If you work full-time, fly on weekends only, have family, side-business, etc. (in other words, lots of other things to do in your life apart from flying) you may expect the process to stretch up to one or two years.
How much does it cost?
Many schools advertise their PPL programs with a total price below €10.000, which is marketing bullsh… hm… not very true.
Some schools may try to attract more students by omitting necessary costs such as landing fees, transport expenses, learning materials, pilot accessories, additional flight hours, theory classes, medical exams, tests, and re-takes. It is important to be aware of these additional costs so that you can properly budget for your pilot training. Having it all included, you may expect the all-inclusive costs to turn as high as €16,000–22,000 or even more!
That’s where your low availability for attending lessons may turn to a financial advantage, because you can spread this amount “naturally” over a year or two and pay it in much smaller bits as your training proceeds.
The Netherlands is definitely not the cheapest country to get a pilot license. If you pursue the most optimal costs, you may find it more practical to get PPL in the USA, New Zealand, Poland, Czech Republic or other countries.
On the positive side: there is high density of airfields, good infrastructure and the excellent landscapes in the Netherlands!
You’ve reached the end of the article. The Force is strong with you!
I hope that this article has not discouraged anyone who is considering learning to fly, but rather has provided some insight into the process of turning your passion for flying into a reality. Flying is a thrilling and rewarding activity, and I encourage anyone who is interested to pursue it.
Go for it, and remember: a good pilot always learns!
Leave a Reply